How about that title, eh?!
Now, I understand that that title alone is really building up expectations to the recipe I’m about to share with you. I am a self-proclaimed cookie monster and have been baking them by myself since grade school. I LOVE eating cookies, and I love making them.
Chocolate chip cookies will always be my favorite cookie. I’ve made chocolate chip cookies at least once a week the past 10+ years, and often it’s more like twice a week. I know….. I’ve gotten to the point where I know when my cookies are done by smell. How’s that for a weird talent?
Before you judge me, giving away cookies is a sign of love for me. It’s an easy service for me to do and I happen to love to bake. Never mind, judge me! But judge me for being awesome.
Everyone and their grandma has “the best” chocolate chip cookie recipe in their arsenal. I think I’ve tried every single one the internet has to offer, including the New York Times’ one, Neiman Marcus, and every revered food blogger and Pinterest-favorite. I’m made some amazing cookies and some not so amazing cookies. Some poor friends have had to accept my many “experiments.” But can I tell you a secret? It’s not so much about the exact measurements of what ingredients you use, it’s more about these three things:

1) Quality Chocolate: I honestly think most recipes out there will be amazing if you use top-notch chocolate. I love dark chocolate, but for my cookies I like milk. Regardless of your preference–milk, semi-sweet, or dark–do not skimp on the chocolate you use in your cookies. Otherwise, you really won’t ever reach Chocolate Chip Nirvana. My absolutely favorite is the Guittard brand, housed in a beautiful silver bag. I usually have five bags on hand at a time, tucked away on my chocolate shelf in my fridge. (What? You don’t have one of those?!) Also, I always add more chocolate chips than the recipes call for…
 |
| These are ready to go into the freezer. |
2) Chilled Dough: I admit, I’m not always the best at taking my own advice here. But truly, if you take even an hour to chill the dough, your cookies will be so. much. better. And my ultimate tip in this regard? Use frozen dough balls! When I make a batch of cookies, I usually cook a sheet-full, and then fill up another large pan with dough balls. (Don’t smash them down!) I put that in the freezer and once the balls are frozen, I put them in a ziplock bag and back in the freezer they go until I want to cook off a few, or 20. Keep in mind, frozen cookie dough will need to be cooked just a touch longer than room-temperature dough. And you might not have time to freeze your dough–so, just pop them in the fridge for an hour and scoop and cook! Please take my word for this! If you have chilled dough, the outside of your cookie will be just the tiniest bit golden and the inside still chewy and doughy, but cooked-doughy. This leads me to my final, and favorite, tip!

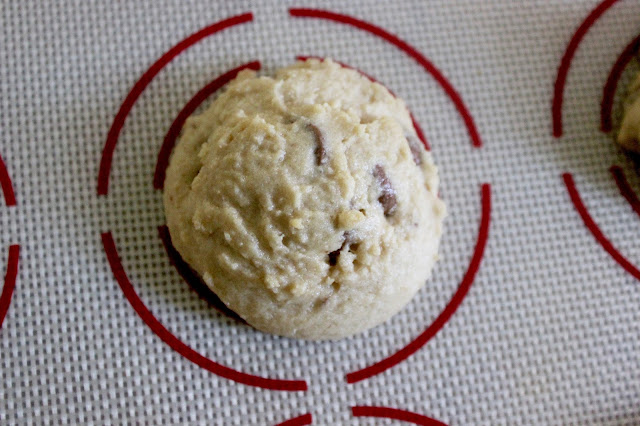
3) “Underbake:” This is in quotation marks because you aren’t actually underbaking your cookies so that they are completely raw in the middle. But what I mean by “underbake” is you take your cookies out when they APPEAR to still be a touch underbaked. For me, I look for a slightly matte top and bubbles that are starting to pop. (Look closely!) So many recipes say to take the cookies out when the edges are golden. In my experience, that is still too long. You want the bottom of your cookies to be the tiniest bit golden. This happens best when you take them out a minute or two before you think you should, then leave them on the pan for about five minutes to finish cooking. Here are some cookies to help illustrate (I recommend clicking on these photos so you can see them better close-up):
 |
| This is right when it’s out of the oven. See the matte top and bubbles just popping? Since these were frozen, the inside will be nice and chewy. |
 |
| Again, right out. They are slightly puffed up still. |
 |
| Zoomed out: Right out of the oven, going to cook more while resting on the pan. |
 |
| After resting on the pan for about five minutes. See the difference?! |
Extra Notes: 1) A silpat liner will change your life. (Here some on amazon that are cheap and well-reviewed: 1, 2, 3.) I got three of them in a package for $20 at Costco and I’m never going back. 2) Know your oven! Mine tends to cook faster, so change the minutes I advise accordingly, based off of your oven. 3) I prefer dark brown sugar over regular brown sugar. 4) Extra vanilla makes your cookies sing! 5) Always, always, always use unsalted butter. That way you control the amount of salt in your recipe. 6) If you want to sprinkle a little sea salt over your cookies right when they get out of the oven, be my guest!
OK, drumroll please! My favorite chocolate chip cookies are buttery, chewy, soft, and a teeny bit salty. After YEARS of experimenting, this is my go-to recipe. (For you high-altitude people, I’d recommend adding another tablespoon or two of flour!)
The ULTIMATE Chocolate Chip Cookies
1 cup of room-temperature unsalted butter (not too hard, not too soft!)
1 cup brown sugar
1/2 cup white sugar
1 egg
1 egg yolk
1 TB vanilla
2 1/2 cups plus 2 TB of flour
1/2 tsp baking soda
1/2 tsp baking powder
1 tsp salt
2-3 cups chocolate chips
(If cooking immediately, preheat oven to 350. I highly recommend chilling your dough though!) Cream together butter and the sugars. Mix until everything is well-whipped. While mixing, in a separate bowl sift your dry ingredients, minus the chocolate. Add the egg and egg yolk to the wet ingredients in the mixer, mixing well in between. Scrape down. Add vanilla. Scrape down again. Add your dry ingredients in three rounds, mixing it only barely enough between rounds. Before your last round, add the chocolate chips and then the last bit of dry ingredients. Mix until there’s still some flour showing, then hand-fold the dough until the flour barely disappears. Chill your dough (1 hour – 24 hours) OR freeze your dough into 1 1/2 – 2 TB balls on a cookie sheet (I use a #40 scoop). When ready to cook, make sure your oven is properly pre-heated to 350 Fahrenheit. Bake cookies for 7-9 minutes if dough is at room temperature. Bake cookies for 8-10minutes, if frozen. Please see notes above about when to know if your cookies are done!
Enjoy.


Awesome advice! You are such a pro! Thanks for sharing all of your tips! My mouth is watering and I can't wait to try these!!
Mmmmmmmm! I LOVE your cookies!!! This post is pure professional. Looks like perfection in every way right down to the photography! Well done.. I need some cookies now!
So excited to try these! You had me at Guittard…
This is going to happen in my home. Possibly tonight. Thank you! This recipe varies slightly from my go-to, and I can't wait to try it!
Let me know your results! I don't care if they don't work out, I just want to know!
That means SO MUCH! Especially about the photography, because I knew as I hit publish that my photos are crap. I need to buy a better lens, but for now I'm just going to be cheap!
Oh, yeah!!!!! They're the best.
did you make them?!!!!!!!